Showing posts with label CTMH - January / February Idea Book. Show all posts

Sunday, February 28, 2021

Close To My Heart's Vision Boards for Intentional Living


I have the perfect project to help inspire and motivate you this year as we strive to live intentionally—vision boards!!

Our Maker community recently created 12″ × 12″ vision boards using our 
custom wood frames and we’re loving how each turned out so uniquely beautiful!!

A vision board helps you clarify and stay focused on what truly matters to you. What inspires us most about this concept is that everyone chooses different images, photos, ephemera, etc., to help represent their goals. When you mix in beautiful patterned papers, stamps that provide inspiration, and photos you can print in any size, you have no limits to the creative expression of your vision.

Here are a few examples of what our Home Office team created. Each person was given the same collection of basic supplies, yet their boards are all so different, just like their creators.


This 12″ × 12″ framed vision was created using half of one of our scrapbook patterns (Make It from Your Heart Vol. 1, pattern 4) with a mix of stamping, handwriting, and, of course, bling ... achieving that perfect blend of clean images and personal touches!!

The outer 
frame was stained using a stamp pad and sponge, adding color while still showing the wood grain.


This layout uses SVG cut files mixed with stamping and stickers to create a large title.

Tags and polaroid-like frames help bring emphasis to the elements on the page.

Remember, if you don’t have a photo of your aspirations, the internet is your friend!!

You can find any image and print them just as you would a photo to help you document your vision.

This 
frame was covered with a light color of Distress Oxide ink to give a more solid coverage to the wood.


This board uses the awesome collage template found at 
Persnickety Prints.

Paired with our 
Multi Circle Windows Thin Cuts, you can create a template of your photos and frame it with this versatile die-cut shape.

Use the negative space circles from the die to create a banner for added detail.

This concept lets you put small images as one focal point in your frame and create a reference list to support it.

We colored the 
wood frame and a few wood embellishments with Gloss Spray, which added intense color as well as a little shimmer.


This next idea makes the pattern paper really shine!!

We love using the retro polaroid style to make photos pop off the page.

This was done with an SVG file, but you can easily print from 
Pernsickety’s 3″ × 4″ retro prints for the perfect uniform display of your photos and goals.

Mix in some 
stamped sentiments for inspiration, and make things happen!!


This last idea uses four 
12″ x 12″ frames to create one large wall display.

This multi-frame approach allows you to focus each quadrant on a different subject.

Here, we’ve set goals for 
family history, creativity, home, travel and fitness.

Look at all the ways the various 
photo print sizes can be used to help you visualize your goals.

 Thes
e frames were painted with black acrylic paint.

We hope these creative displays we shared for our 2021 visions will inspire you to create one for yourself.

Manifesting your vision through photos paired with written words truly help realize what is possible.

Putting a beautiful collection together will undoubtedly inspire you to create the life you desire for the new year!!


Left -- Wood Frame (CC2102) - $14.95
Right -- My Acrylix Make It Happen Stamp Set (E1061) - $31.95


Check out our very own Jill Broadbent talking about these beautiful boards with out friends in Studio 5!


Saturday, February 27, 2021

Keeley's Kreations YouTube Video: Craft with Heart Cardmaking Subscription - Cards 4 thru 6


Today I'm going to show you just how easy it really is to create the Craft with Heart Cardmaking Subscription Cards 4 thru 6!!

Keep up with all the occasions in your life with a Craft with Heart Cardmaking subscription.

Each delivery includes materials to create a set of beautiful, handmade cards, that will come together in a snap thanks to pre-printed card bases, die-cut shapes, and more.

Each delivery also includes an exclusive My Acrylix
 stamp set, complete with stamping block and mini ink pads, so you’ll have the tools you need to create your cards just the way you want them.

Sooooo many awesome products at such an awesome price ... 
how can you resist?!?!

A complete handmade card with envelope is only $1.04!!

That's sooooo crazy good!!

Check out my unboxing video of the January thru April 
Craft with Heart Cardmaking Subscription ... HERE!!

Check out my video on creating Cards 1 thru 3 ... HERE!!

Let's check out how easy it is to create these cards as per the instructions by Close To My Heart and then again jazzed up with goodies I have in my stash like Shimmer Brushes, Stickles, Shimmer Tape, Sequins, etc.


CTMH Craft with Heart Cardmaking Subscription - Card 4


Left created as per the instructions by CTMH.
Sparkle and Shine version on the right.


The card above was created as per the instructions from CTMH.


The card above was created using the Sapphire Glitter Paper, Black Bursts and White Dots for the center of the flowers.


CTMH Craft with Heart Cardmaking Subscription - Card 5


Left created as per the instructions by CTMH.
Sparkle and Shine version on the right.


The card above was created as per the instructions from CTMH.


The card above was created using the Ballerina Glitter Paper with the confetti from the Heart Shaker Window Thin Cuts, the Clear Shimmer Brush on the daisy petals and the retired Bashful Shimmer Brush inside the shaker window and the center of the daisy.


CTMH Craft with Heart Cardmaking Subscription - Card 6


Left created as per the instructions by CTMH.
Sparkle and Shine version on the right.


The card above was created as per the instructions from CTMH.


The card above was created using the Ballerina Glitter Paper, the confetti from the Heart Shaker Window Thin Cuts, the Clear Shimmer Brush on the daisy petals and the retired Bashful Shimmer Brush inside the shaker window and the center of the daisy.


If you enjoyed these videos ... please hit the SUBSCRIBE button and check out other videos from my YouTube Channel!!
Check out the different Subscription Pricing Options HERE!!

If you are ready to jump in and Subscribe to start getting your LAGOON CARDMAKING BOX click on the cards below!!


Close To My Heart's Slimline Cards with a New Thin Cut Die and Shaker Windows


We are getting crafty with slimline cards today!!

Slimline cards are a fun change from the standard, 4¼” x 5½”, size cards.

They’re long and narrow, typically measuring 3½” x 8½”, providing a much larger surface area on which to create a design.

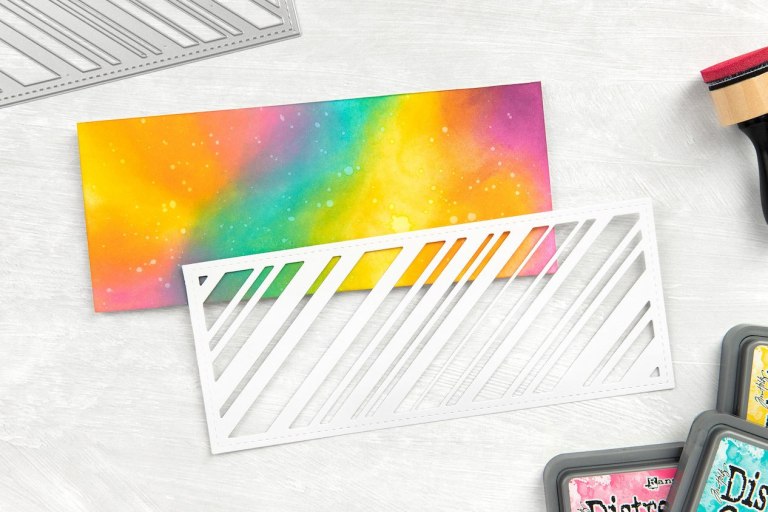
One of my favorite Thin Cuts currently available from our January–February Catalog is the
 Diagonal Stripe Slimline die that cuts a beautiful diagonal stripe pattern, sized especially for the front of a slimline card.

Paired with a few simple techniques, it’s easy to create a wide variety of looks with this eye-catching pattern.

I hope that once you’re done visiting with me today, you will leave here feeling inspired and ready to create some of these beauties of your own!!


This first card has a gorgeous, somewhat fantastical galaxy, look to its background.


The card base was sponged with 
Distress Oxide inks and a Mini Ink Blending Tool, creating an exaggerated version of the colors that are most often associated with the northern lights (pink, green, yellow, blue, and violet).

The small, star-like spots are the oxidizing effect of the ink when we splattered it with water. When we finally layered the die-cut
 made using the Diagonal Stripe Slimline Thin Cuts, our out-of-this-world look was complete!!

The White Daisy lines from the die-cut look like a meteor shower!!

These next two cards take two additional approaches to using the
 Diagonal Stripe Slimline die.

The top card, even though it is more adorable than most store-bought cards, came together in a matter of minutes!!

We first covered the front of the card base with a solid piece of patterned paper, then layered the diagonal stripe die-cut, also cut from patterned paper, on top.

From there, it was a simple matter of weaving in stickers (from our
 Sweet Safari collection) through the diagonal paper strips.

Complete the card with a stamped sentiment on a solid color cardstock and embellish with more cardstock, gems, or stickers.


The background of this third, Congrats, card is a little more involved than the first two we’ve shown you so far, but it is still not difficult to achieve!!


We decided to back 10 of the open spaces of the die-cut with patterned pieces of paper, leaving the remaining spaces free for stamping later.

You know those scraps you just can’t seem to throw away?

Well, pull them out because this is a great way to use them!!

All you need are strips of paper that are large enough to cover the gaps.

We used 5″ long strips of patterned papers, between ¼” to a smidgen over a ½” wide, and attached them to the die-cut using adhesive only along the top and bottom border.

Then, we just trimmed any excess that was hanging over and attached the prepared die-cut, front side up, to a blank card base.

This last card we are sharing with you today is a show-stopping,
 slimline shaker window card!!


Follow along with our Creative Arts Manager, Karen Pedersen, in the video below to see how this endearing card comes together.

Several of the pieces, including the two top frames, were cut using our Cricut
 Art Philosophy collection and Design Space’s Basic Shapes.

You can find all of our exclusive Close To My Heart Cricut Collections on my Cricut Affiliate Link ... HERE!!


Click here for the FREE Cricut Design Space file!!


Here are the exact dimensions and papers needed to recreate this adorable shaker card.

Please Note: The X6050 Flamingo Cardstock Piece had an error ... it is 8 1/2" x 2" ... not 8 1/2" x 3 1/2".


If you’d like to duplicate our example card exactly, you will need the following materials:

1 – slimline card base
1 – 8½” x 3½” Party Time pattern paper
1 – 8½” x 2″ Flamingo cardstock
1 – 7¾” x 2¾” Distress Watercolor Cardstock (on Design Space file)
1 – 8¼” x 3¼” scalloped Ballerina cardstock rectangle with cutout squares (on Design Space file)
1 – 8″ x 3″ scalloped Flamingo cardstock rectangle (on Design Space file)
1 – 2″ White Daisy cardstock circle (on Design Space file)
Additional White Daisy cardstock for penguins
Winter Penguins Stamp + Thin Cuts
My Acrylix Little Miss Message Stamp Set
My Acrylix Doodled Borders Stamp Set
Flamingo Exclusive Inks Stamp Pad
Nectarine Exclusive Inks Stamp Pad
Intense Black Exclusive Inks Stamp Pad
Peacock Feathers Distress Oxide Ink Pad
Sweet Safari Puffy Stickers
Pink Acrylic Hearts
Iridescent Flower Confetti
Silver Embellishing Thread
Aqua Blue TriBlend Marker
Orange TriBlend Marker
Ice Grey TriBlend Marker
Dull Green TriBlend Marker
Black Journaling Pen (.01)
Square Shaker Window Foam + Acetate
Mini Ink Blending Tool
3-D Foam Tape
Thin 3-D Foam Tape
Die-cutting & Embossing Machine

VIP Customers Please Note ...


The items used to create the cards are eligible to earn your 15% VIP Bank Credit!!

They are also eligible for purchase using VIP Bank Credit.

The amount paid for the item counts toward earning the 
Stamp of the Month for FREE!!

Wednesday, February 24, 2021

Close To My Heart's New Months of the Year Stamp Set Series


There’s something to love about each month and season, so we’re rolling out an entire years’ worth of stamping fun with a 
Months of the Year stamp series!!

With sentiments, icons, and borders for a variety of crafting projects, the stamp sets in the
 Months of the Year series provide a way to create beautiful artwork for any time of year.

Today, I'm going to show off a few of the ways that the
 January and February sets can be used, and I have a feeling that once you’ve seen these two, you won’t be able to wait for the rest!!

With every new set comes new opportunities to craft
 calendar pages, layouts, and so much more!!

Each Months of the Year set comes with a variety of different stamps to aid you as you create seasonally specific artwork all though the year.

Throughout 2021, these stamps sets will be released, two at a time, with each of our
 bi-monthly catalogs, so you can look forward to the release of new sets through the end of the year!!


Because Close To My Heart serves a global market, we’ve created two stamp sets for each month—one for crafters in the northern hemisphere, and another for artists in the southern hemisphere!!

(
Fun Fact: Seasons are reversed between the northern and southern hemispheres!! When someone in the US might be sledding or skiing, it would be a great time to hit the beach in Australia!!)

These stamp sets are not only great to use individually but can also be used to create your own series of artwork along a theme!!

One of the most challenging parts of memory keeping can trying to decide which stories to tell, and where they should be placed.

With a separate set designed for each month of the year, it’s easy to put together monthly scrapbook pages and in no time, you’ll have an entire album telling the story of the past year!!

This adorable Valentine layout is a wonderful example of how the stamps from the
 February stamp set can be used as perfect accents for the page design.


In this example, it’s easy to see how well the stamps and the paper we used complement each other, even though they weren’t specifically designed to coordinate with each other.

Each Months of the Year set is easy to integrate into your artwork and includes enough variety to mix well with all our 
paper collections!!

In addition to scrapbook layouts, the Months of the Year stamp sets are also a great tool to use when creating calendar pages!

As you can see here, we’ve used these stamps to add decoration to
 full-size calendars and smaller perpetual calendars as well!!


The Months of the Year stamp sets will all be available through the end of 2021, so you can order them at a time that works for you, pick and choose your favorites from the series, or get them regularly as they’re released.

No matter when or where you use these stamps, we know you’ll love the beautiful designs and gorgeous artwork you can create with them!!


VIP Customers Please Note ...


The items used to create the artwork above are eligible to earn your 15% VIP Bank Credit!!

They are also eligible for purchase using VIP Bank Credit.

The amount paid for the item counts toward earning the 
Stamp of the Month for FREE!!

Tuesday, February 23, 2021

Close To My Heart Artwork with Hey Hi Hello


Create your own fun cards and layouts using the 
Hey Hi Hello stamp set!!


8½" x 3½" A Whole Lot of Love Card Recipe ...
D1989 My Acrylix Hey Hi Hello Stamp Set
Z6501 Ballerina Exclusive Inks Stamp Pad
Z2812 Raspberry Exclusive Inks Stamp Pad
Z6514 Wisteria Exclusive Inks Stamp Pad
Z3515 Black Journaling Pen (.01)
Z697 Round Sponge
X257 Slimline Cards & Envelopes


(D1989) - $18.95


VIP Customers Please Note ...


The items used to create this card are eligible to earn your 15% VIP Bank Credit!!

They are also eligible for purchase using VIP Bank Credit.

The amount paid for the item counts toward earning the 
Stamp of the Month for FREE!!

Sunday, February 21, 2021

Close To My Heart Artwork with Sweet Bouquet Stamp + Thin Cuts


Create your own beautiful and elegant cards and layouts using the 
Sweet Bouquet Stamp + Thin Cuts!!


6" x 6" Bloom & Grow Page Recipe ...
Z3923 Sweet Bouquet Stamp + Thin Cuts
X9023 Mix-in Paper Packet
X6053 Avocado Cardstock
X6047 Black Cardstock
X6046 French Vanilla Cardstock
X5985 Smoothie Cardstock
Z3271 Archival Black Exclusive Inks Stamp Pad
Z4189 Intense Black Exclusive Inks Stamp Pad
Z4213 Silver Embellishing Thread
Z4191 Silver Glitter Gems
Z3869 Wood Hearts
Z3688 Stitched Scalloped Brackets Thin Cuts
Z3630 Watercolor Pencils
Z3785 Icicle Stickles Glitter Glue
Z341 Glue Dots Mini Dots
Z2060 Thin 3-D Foam Tape
Die-cutting & Embossing Machine


(Z3923) - $30.95

Includes the My Acrylix Sweet Bouquet stamp set and 7 metal dies to cut the shapes shown here.

Thin Cuts are package on their own magnetic sheet and work well with most die-cutting machines.

Sweet Bouquet (D1993) - $18.95
Set of 11 stamps (Thin Cuts metal dies not included).


The sentiments in this stamp set fit wonderfully on the shapes cut using the four sets of Stitched Bracket Thin Cuts shown on page 45 of our Core Products Catalog.


Stitched Simple Brackets Thin Cuts (Z3687) - $9.95

Use these 2 thin metal dies to quickly and easily cut the shapes shown.

Shape sizes: 3 1/2", 3" (wide).

Thin Cuts are packaged on their own magnetic sheet and work well with most die-cutting machines.


Stitched Scalloped Brackets Thin Cuts (Z3688) - $9.95

Use these 2 thin metal dies to quickly and easily cut the shapes shown.

Shape sizes: 3 1/2", 3" (wide).

Thin Cuts are packaged on their own magnetic sheet and work well with most die-cutting machines.


Stitched Fancy Brackets Thin Cuts (Z3686) - $12.95

Use these 2 thin metal dies to quickly and easily cut the shapes shown.

Shape sizes: 3 1/2", 3 1/4" (wide).

Thin Cuts are packaged on their own magnetic sheet and work well with most die-cutting machines.


Stitched Brackets Thin Cuts (Z3631) - $9.95

Use these 3 thin metal dies to quickly and easily cut the shapes shown.

Shape sizes: 2 3/4", 2", 1 1/4".

Thin Cuts are packaged on their own magnetic sheet and work well with most die-cutting machines.


You can also get the first 3 sets of Stitched Brackets in a Bundle ...


Stitched Brackets Thin Cuts Bundle (Z3757) - $32.85

Includes one each of Stitched Simple Brackets (Z3687), Stitched Fancy Brackets (Z3686), and Stitched Scalloped Brackets (Z3688) Thin Cuts.

Thin Cuts are packaged on their own magnetic sheet and work well with most die-cutting machines.


VIP Customers Please Note ...


The items used to create this card are eligible to earn your 15% VIP Bank Credit!!

They are also eligible for purchase using VIP Bank Credit.

The amount paid for the item counts toward earning the 
Stamp of the Month for FREE!!