

We are getting crafty with slimline cards today!!
Slimline cards are a fun change from the standard, 4¼” x 5½”, size cards.
They’re long and narrow, typically measuring 3½” x 8½”, providing a much larger surface area on which to create a design.
One of my favorite Thin Cuts currently available from our January–February Catalog is the Diagonal Stripe Slimline die that cuts a beautiful diagonal stripe pattern, sized especially for the front of a slimline card.
Paired with a few simple techniques, it’s easy to create a wide variety of looks with this eye-catching pattern.
I hope that once you’re done visiting with me today, you will leave here feeling inspired and ready to create some of these beauties of your own!!

This first card has a gorgeous, somewhat fantastical galaxy, look to its background.
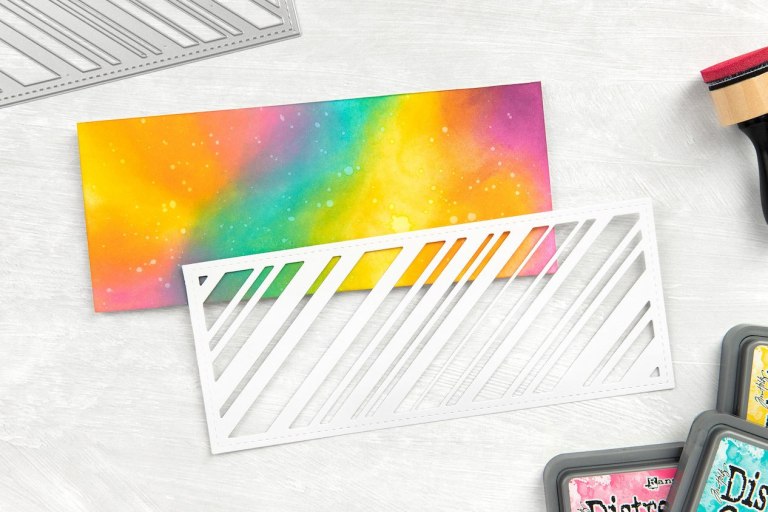
The card base was sponged with Distress Oxide inks and a Mini Ink Blending Tool, creating an exaggerated version of the colors that are most often associated with the northern lights (pink, green, yellow, blue, and violet).
The small, star-like spots are the oxidizing effect of the ink when we splattered it with water. When we finally layered the die-cut made using the Diagonal Stripe Slimline Thin Cuts, our out-of-this-world look was complete!!
The White Daisy lines from the die-cut look like a meteor shower!!
These next two cards take two additional approaches to using the Diagonal Stripe Slimline die.
The top card, even though it is more adorable than most store-bought cards, came together in a matter of minutes!!
We first covered the front of the card base with a solid piece of patterned paper, then layered the diagonal stripe die-cut, also cut from patterned paper, on top.
From there, it was a simple matter of weaving in stickers (from our Sweet Safari collection) through the diagonal paper strips.
Complete the card with a stamped sentiment on a solid color cardstock and embellish with more cardstock, gems, or stickers.

The background of this third, Congrats, card is a little more involved than the first two we’ve shown you so far, but it is still not difficult to achieve!!

We decided to back 10 of the open spaces of the die-cut with patterned pieces of paper, leaving the remaining spaces free for stamping later.
You know those scraps you just can’t seem to throw away?
Well, pull them out because this is a great way to use them!!
All you need are strips of paper that are large enough to cover the gaps.
We used 5″ long strips of patterned papers, between ¼” to a smidgen over a ½” wide, and attached them to the die-cut using adhesive only along the top and bottom border.
Then, we just trimmed any excess that was hanging over and attached the prepared die-cut, front side up, to a blank card base.
This last card we are sharing with you today is a show-stopping, slimline shaker window card!!

Follow along with our Creative Arts Manager, Karen Pedersen, in the video below to see how this endearing card comes together.
Several of the pieces, including the two top frames, were cut using our Cricut Art Philosophy collection and Design Space’s Basic Shapes.
You can find all of our exclusive Close To My Heart Cricut Collections on my Cricut Affiliate Link ... HERE!!

Here are the exact dimensions and papers needed to recreate this adorable shaker card.
Please Note: The X6050 Flamingo Cardstock Piece had an error ... it is 8 1/2" x 2" ... not 8 1/2" x 3 1/2".

If you’d like to duplicate our example card exactly, you will need the following materials:
1 – slimline card base
1 – 8½” x 3½” Party Time pattern paper
1 – 8½” x 2″ Flamingo cardstock
1 – 7¾” x 2¾” Distress Watercolor Cardstock (on Design Space file)
1 – 8¼” x 3¼” scalloped Ballerina cardstock rectangle with cutout squares (on Design Space file)
1 – 8″ x 3″ scalloped Flamingo cardstock rectangle (on Design Space file)
1 – 2″ White Daisy cardstock circle (on Design Space file)
Additional White Daisy cardstock for penguins
Winter Penguins Stamp + Thin Cuts
My Acrylix Little Miss Message Stamp Set
My Acrylix Doodled Borders Stamp Set
Flamingo Exclusive Inks Stamp Pad
Nectarine Exclusive Inks Stamp Pad
Intense Black Exclusive Inks Stamp Pad
Peacock Feathers Distress Oxide Ink Pad
Sweet Safari Puffy Stickers
Pink Acrylic Hearts
Iridescent Flower Confetti
Silver Embellishing Thread
Aqua Blue TriBlend Marker
Orange TriBlend Marker
Ice Grey TriBlend Marker
Dull Green TriBlend Marker
Black Journaling Pen (.01)
Square Shaker Window Foam + Acetate
Mini Ink Blending Tool
3-D Foam Tape
Thin 3-D Foam Tape
Die-cutting & Embossing Machine

The items used to create the cards are eligible to earn your 15% VIP Bank Credit!!
They are also eligible for purchase using VIP Bank Credit.
The amount paid for the item counts toward earning the
Stamp of the Month for FREE!!
No comments:
Post a Comment